The answers to these questions are so detailed! 11 answers to frequently asked questions in the field of mold tooling
2020-04-05
1. What is the most important and decisive factor in choosing a die steel?
Forming method: two basic material types can be chosen from.
A) Hot machined tool steel, which can withstand relatively high temperatures during die casting, forging and extrusion.
B) Cold worked tool steel, which is used for underfeeding and shearing, cold forming, cold extrusion, cold forging and powder press forming.
Plastics: some plastics produce corrosive by-products, such as PVC plastic. Condensation, corrosive gases, acids, cooling/heating, water or storage conditions caused by prolonged shutdowns can also produce corrosion. In these cases, it is recommended to use die steel of stainless steel material.
Die Size: Pre-hardened steel is often used for large size dies. Overall hardened steel is often used in small size molds.
Number of times the mold is used: long term (> 1 000 000 times) molds should use high hardness steel with a hardness of 48-65 HRC. medium term (100 000 to 1 000 000 times) molds should use pre-hard steel with a hardness of 30-45 HRC. short term (surface roughness - many plastic mold makers are interested in good surface roughness. When sulfur is added to improve metal machining performance, surface quality decreases as a result. Steels with high sulfur content also become more brittle.
2. What are the primary factors that affect the cutability of materials?
The chemical composition of steel is important. The higher the alloy composition of steel, the more difficult it is to process. As the carbon content increases, the metal's machining performance decreases.
The structure of the steel is also very important for metal machining performance. The different structures include: forged, cast, pressed, rolled and machined. Forgings and castings have very difficult surfaces to machine.
Hardness is an important factor that affects metal machining performance. The general rule is that the harder the steel, the more difficult it is to work. High Speed Steel (HSS) can be used for hardness up to 330-400 HB; HSS + titanium nitride (TiN) coated for hardness up to 45 HRC; and for hardness 65-70 HRC, carbide, ceramic, metallic ceramic and cubic boron nitride (CBN) must be used.
Non-metallic involvement generally has an adverse effect on tool life. For example, Al2O3 (aluminum oxide), which is a pure ceramic, has a strong abrasive property.
The last one is residual stress, which can cause problems with metal machining performance. It is often recommended that the stress release process be carried out after rough machining.
3. What are the components of the production cost of mould manufacturing?
Roughly speaking, the cost distribution is as follows: machining 65%, workpiece material 20%, heat treatment 5%, assembly/adjustment 10%. It is also a very clear indication of the importance of good metal machining performance and an excellent overall machining solution for the economic production of molds.
In general, it is: the harder and stronger the cast iron, the lower the metal's machining performance and the lower the life expectancy from inserts and tools. Cast iron used in metal machining production has generally good metal machining performance for most types.
The machining performance of the metal is related to its structure, and the harder pearlite cast iron is more difficult to process. Flake graphite cast iron and malleable cast iron have excellent machining properties, while ductile iron is quite bad.
On the other hand, diffuse wear is temperature-dependent and occurs at high machining speeds, especially when using high strength cast iron grades. These grades have a high resistance to mold change, resulting in high temperatures. This wear is related to the interaction between the cast iron and the tool, which causes some cast iron to be machined with ceramic or cubic boron nitride (CBN) tools at high speeds to achieve good tool life and surface quality.
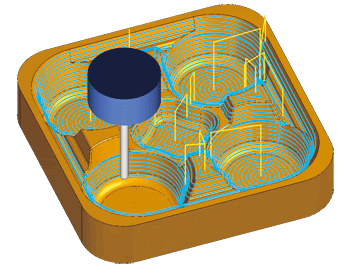
4. What are the main and common processing processes in mold manufacturing?
The machining process should be divided into at least three process types: roughing, semi-finishing and finishing, and sometimes even super-finishing (mostly for high-speed machining applications). Residual milling is, of course, prepared for finishing after a semi-finishing process. It is important to strive to leave an evenly distributed margin in each process for the next. If there are few rapid changes in the direction of the tool path and work load, the tool life may be longer and more predictable. If possible, the finishing process should be performed on a dedicated tool machine. This will improve the geometric accuracy and quality of the mold in a shorter commissioning and assembly time.
5. What are the main types of tools to be used in these different processes?
Roughing processes: round insert end mills, ball end mills and end mills with large tip radii.
Semi-finishing processes: Round insert mills (round insert mills with diameters from 10 to 25 mm), ball end mills.
Finishing processes: round insert end mills, ball end mills.
Residual quantity milling processes: round insert mills, ball end mills, upright mills.
It is important to optimize the machining process by selecting a specialized combination of tool size, groove and grade, as well as machining parameters and an appropriate milling strategy.
6. Is there a single most important factor in the machining process?
One of the most important goals in the machining process is to create an evenly distributed machining margin for each type of tool in each process. This means that tools of different diameters (from large to small) must be used, especially in roughing and semi-finishing processes. The main criterion at all times should be to be as close as possible to the final shape of the mould in each process.
7. Why is the round insert milling cutter most often used as the first choice of tool for mold roughing?
The round inserts can be milled in a variety of materials and in all directions, and if used, the transition between adjacent toolpaths is smoother and can also leave a smaller and more uniform machining margin for semi-finishing.
One of the characteristics of round blades is that they produce variable chip thickness. This allows them to use a higher feed rate than most other cutters.
The main deflection of the round insert changes from almost zero (very shallow machining) to 90 degrees, and the machining action is very smooth. At the maximum depth of the cut, the main deflection angle is 45 degrees, and when machining along a straight wall imitation with an outer circle, the main deflection angle is 90 degrees. This also explains why the strength of the round insert tool is high - the machining load is gradually increasing.
Through the use of good programming, round insert end mills can largely replace ball end mills. Round inserts with low runout combined with finely ground, positive front corners and light-machining grooves can also be used for semi-finishing and some finishing processes.
8. What is the effective machining speed (VE) and why is it important for high productivity?
In machining, the basic calculation of the effective machining speed at the actual or effective diameter is always very important. Since the table feed depends on the rotational speed at a certain machining speed, if the effective speed is not calculated, the table feed will be incorrectly calculated.
If the nominal diameter value (Dc) of the tool is used in the calculation of the machining speed, the effective or actual machining speed is much lower when the depth of cut is shallow. Tools such as the round insert CoroMill 200 (especially in the small diameter range), ball head end mills, large-tip arc radius end mills, and CoroMill 390 end mills (for these tools, see Sandvik's C-1102:1 Die Fabrication Sample). As a result, the calculated feed rate is also much lower, which severely reduces the production rate. More importantly, the machining conditions of the tool are below its capabilities and recommended range of applications.
When machining in 3D, the diameter of the cut changes, which is related to the geometry of the die. One solution to this problem is to define the steep wall area of the mold and the geometrically shallow part area. Good compromises and results can be achieved if specialized CAM procedures and machining parameters are prepared for each area.
One of the main factors to be observed when finishing hardened die steel with high speed milling is the use of shallow machining. The machining depth should not exceed 0.2/0.2 mm (AP/AE: axial machining depth/radial machining depth). This is to avoid excessive bending of the shank/machining tool and to maintain small tolerances and high accuracy of the mold being machined.
It is also important to choose clamping systems and tools that are rigid. When using an overall carbide tool, it is important to use a tool with a maximum core diameter (maximum flexural rigidity). A rule of thumb is that if the diameter of the tool is increased by 20%, for example from 10 mm to 12 mm, the bending of the tool will be reduced by 50%.
It can also be said that if the overhang/extension of the tool is shortened by 20%, the bend of the tool will be reduced by 50%. The large diameter and tapered shank further increases the rigidity. When using ball end mills with indexable inserts (see Die Fabrication Sample C-1102:1), bending stiffness can be increased 3-4 times if the shank is made of integral carbide.
When finishing hardened die steel with high speed milling, it is also important to choose a special groove shape and grade. It's also important to choose a coating that has a high thermal hardness like TiAlN.
The main recommendation is: use as much of the straight milling as possible.
When the machining edge has just been cut, the thickness of the chip reaches its maximum in straight milling. And in inverse milling, the minimum value. In general, tool life is shorter in back milling than in straight milling, which is due to the fact that the heat generated in back milling is significantly higher than in straight milling. When the chip thickness increases from zero to maximum in back milling, more heat is generated because the machining edge is subjected to stronger friction than in back milling. The center diameter of the back milling is also significantly high, which has a negative effect on the spindle bearings.
In straight milling, the machining edge is mainly subjected to a compressive stress, which has a much more favorable effect on the carbide insert or the carbide tool as a whole compared to the tension generated in reverse milling. There are exceptions, of course. When side milling (finishing) is performed with integral carbide end mills (see tool in die sample C- 1102:1), especially in hardened materials, reverse milling is preferred. This makes it easier to get smaller tolerances for wall straightness and a better 90-degree angle. If there is no overlap between the different axes, there is a very small contact mark. This is mainly due to the direction of the machining force. If a very sharp machining edge is used in the machining, the machining force tends to "pull" the machining tools towards the material. Another example of reverse milling that can be used is milling with an old manual milling machine that has a larger gap in the screw levers of the old machine. Back milling generates machining forces that eliminate backlash, resulting in a smoother milling action.
9. Profile milling or contour machining?
In cavity milling, the best way to ensure the success of the toolpath is to use a contour milling path.
End mills (e.g., ball end mills, see Die Fabrication Sample C-1102:1) often achieve high productivity by milling along the contour of the outer circle, due to the fact that there are more teeth machining at a larger tool diameter. If the spindle speed of the tooling machine is limited, contour milling will help maintain machining speed and feed rate. With this toolpath, there is little variation in workload and direction.
This is particularly important in high-speed milling applications and in hardened material processing. This is because if the machining speed and feed are high, the machining edge and the machining process are more susceptible to adverse effects of changes in work load and direction, which can cause changes in machining force and tool bending. Molding along steep walls should be avoided as much as possible. In lower profile milling, the chip thickness is large at low machining speeds.
In the middle of the ball nose end mills, there is also the danger of the blade chipping. If the control is poor, or the tool machine does not have pre-reading, it cannot decelerate fast enough and is most susceptible to the risk of blade chipping in the center. Upper faux milling along the steep wall is better for the machining process because the chip thickness is at its maximum at a favorable chip speed.
For maximum tool life, the machining edge should be kept continuous for as long as possible during the milling process.
If the tool enters and exits too frequently, the tool life will be significantly reduced. This exacerbates thermal stress and heat fatigue on the machining edge. Having a uniform and high temperature in the machining area is more beneficial to modern carbide tools than having large fluctuations. The faux milling path is often a mixture of back milling and straight milling (zigzag), which means that there is frequent tool eating and back milling during machining. This toolpath also has a bad effect on mold quality. Every time the machining tools is eaten it means the machining tools is bent and there is a raised mark on the surface. As the tool exits, the machining force and bending of the tool decreases and there is a slight "overcut" of material in the exit section.
Milling cutters are multi-machining edge cutters where the number of teeth (Z) is variable and there are a number of factors that can help determine the pitch or number of teeth used for different types of machining.
Materials, workpiece dimensions, overall stability, overhang dimensions, surface quality requirements and available power are the factors that are relevant to machining. Factors related to the machining tools include adequate feed per tooth, having at least two teeth machining at the same time, and the chip capacity of the machining tools, to name just a few.
The tooth pitch (U) of a milling cutter is the distance from a point on the machining edge of the insert to the same point on the next machining edge. Milling cutters are divided into sparse, dense, and extra dense pitch cutters, and most Cokehead milling cutters have these three options, see Mold Manufacturing Sample C-1102:1. Dense pitch refers to a higher number of teeth and proper chip tolerance for machining at a high metal removal rate. Generally used for medium load milling of cast iron and steel. Close pitch is the preferred choice for general purpose milling cutters and is recommended for hybrid production.
Sparse spacing is defined as having fewer teeth on the circumference of the milling cutter and having a large chip tolerance space. Spacing is often used in the roughing to finishing of steel, where vibrations have a significant impact on the results. Spacing is a truly effective solution to the problem and is the preferred choice for long overhang milling, low power tool machines or other applications where machining forces must be reduced.
The ultra-tight pitch tool has very little chip tolerance and can be fed using a higher work table. These tools are suitable for intermittent machining of cast iron surfaces, roughing of cast iron and small residual machining of steel, such as side milling. They are also suitable for applications where low machining speeds must be maintained. The cutter can also have even or unequal spacing of the teeth. The latter refers to the unequal spacing of the upper teeth of the tool, which is also an effective solution to the vibration problem. When vibration is a problem, it is recommended to use sparred, unequal pitch milling cutters whenever possible. With fewer blades, there is less chance of vibration intensification. Smaller tool diameters can also improve this situation. A combination of grooves and grades that fit well should be used - sharp machining edges and a combination of grades with good toughness.
10. How should the milling cutter be positioned for optimum performance?
The machining length is affected by the position of the milling cutter. Tool life is often related to the length of cut that the machining edge must bear. A milling cutter positioned in the center of a workpiece has a short machining length, and the arc of the cutter will be long if the cutter is deflected from the center line in either direction.
A compromise must be reached to remember how the machining force works. With the tool positioned in the center of the workpiece, the direction of the radial machining force changes as the machining edge of the insert enters or exits the cut. The clearance of the tool machine spindle also intensifies the vibration, causing the blade to vibrate.
By causing the tool to deviate from the center, a constant and favorable direction of machining force is obtained. The longer the overhang, the more important it is to overcome all possible vibrations.
11. What measures should be taken to eliminate vibrations during the machining process?
When there is a vibration problem, the basic measure is to reduce the machining force. This can be achieved by using the correct tool, method and machining parameters.
Follow the following proven recommendations.
- Select a spaced or unequal pitch milling cutter.
- Use a positive front angle, small machining force insert groove shape.
- Use a small milling cutter as much as possible. This is especially important when milling with shock-absorbing joints.
- Inserts with a small machining edge passivation radius (ER). From a thick coating to a thin coating. Non-coated blades can be used if desired. Highly resilient blade grades with a fine grain matrix should be used.
- Use a large per tooth feed. Reduce the speed and maintain the table feed (equal to the larger feed per tooth). Or maintain the speed and increase the table feed (larger feed per tooth). Never reduce the per tooth feed!
- Reduce radial and axial depth of cut.
- Choose a stable handle, such as a Coke Full Capto. Use as large a handle size as possible for the best stability. Use tapered extensions for maximum rigidity.
- For large overhangs, use a shock-absorbing coupling in combination with a spaced mill with unequal tooth pitch. Install the end mill so that the end mill is directly connected to the shock absorbing handle.
- Keep the end mill off-center of the workpiece.
- If an even number of teeth is used - the blade can be removed every other tooth.